Showing posts with label 26 Things I Made. Show all posts

Tuesday, 31 December 2013

{26 Things I Made}: 25 & 26/26 - two longterm projects!

Just popping in quickly to post my final two projects for the year - twins!  They are not quite finished projects, but they were created in 2013, so I thought they qualified :)


Currently just over 14 weeks and feeling pretty good.  I was very tired and a bit nauseous in the evenings until about 13 weeks, but that seemed to be the worst of it.   No sign of the double dose of morning sickness you are supposed to get with twins.  Fingers crossed it continues that way!

The babies are due in late June, but are likely to be here sometime in late May/early June.  We are both very excited about our next big adventure as parents.  Today we have been painting the nursery and once we find out what flavours the babies are, I will make a start on some cot quilts.  Stay tuned for plenty more baby crafting next year!

Thank you for reading along this year.  Wishing you all a wonderful 2014!

Saturday, 28 December 2013

{26 Things I Made}: 23 & 24/26 - clay ornaments (two ways)

I hope you all had a lovely Christmas with good food and good company.  Our Christmas day ended up being quite busy catching up with my family and Alex's family, and we have enjoyed having a quiet couple of days to potter before the next lot of visitors.  I'm quite surprised that I've managed to complete this 26 Things project with my lack of posting and crafting earlier in the year, but there was a rush of productivity just before Christmas!  Here are number 23 and 24/26.  I'll be back before the New Year to post about my last two special projects...

Baking Soda Clay Ornaments
Baking Soda Clay Ornaments I've seen recipes for baking soda clay all over pinterest and thought it looked like a pretty easy way to make some new white ornaments for the tree.  I also had an idea of making some mini clay Christmas bunting.  The dough sounded ideal (I used this recipe but made a half size batch) - three ingredients, easy to make, the clay stayed white,  you could stamp it with patterns and you could air dry or oven dry it.  Well, this is the story of a pinterest fail!  The dough worked, was lovely to roll out, and easy to stamp.  But, it cracked really badly when it dried (I chose to air dry rather than oven dry so they would dry slowly). They cracked so much that those 6 ornaments in the picture above were all that were salvageable from the entire batch of about 25!  I don't know what went wrong.  It didn't seem to be because of the thickness of the rolled out clay.  I had both thick and thin ornaments crack.  Some ornaments cracked where I had pushed a hole in the for stringing up.  Some cracked where I had stamped them.  Others cracked in random places.

Cracked Baking Soda Clay :(
The ornaments that I did manage to salvage do look lovely.  They did stay white as the instructions promised, but took about 3 days to fully dry.  I painted a couple of them and then sealed them with PVA (white glue).  The rest I covered with PVA and sprinkled with fine white glitter.  These ones are my favourites.  The white glittery stars look lovely on the tree when the fairy lights are on!


Air Dry Clay Ornaments
Air Dry Clay Bunting

Air Dry Clay Ornaments
I was still determined to make my clay bunting, so after some research online, I bought some Jovi Air Dry Clay from Warehouse Stationery.  At only $7 for 500g, I figured if this didn't work either, I wasn't going to be much out of pocket.  But it did work.  Wonderfully well in fact!  Here is my tray of ornaments ready to dry.

Air Dry Clay Ornaments
 I made a paper template for the bunting flags and cut them out with a sharp knife.  The other shapes I cut with cookie cutters.  I used rubber stamps and ordinary crafting ink to decorate them.  Two of the stars are imprinted with a doily that I rolled onto the clay before cutting them out.  They took just over 24 hours to dry fully and then I sprayed them with spray varnish before stringing them on ribbon. I only used about half a packet of dough, so I have plenty left for other projects.  The clay was not as white as the baking soda clay, but it seemed to whiten as it dried.  A much better result - I love my cute new bunting!  I think I might have to make some for birthdays and other occasions so I can have bunting hanging up year round!


Tuesday, 24 December 2013

{26 Things I Made}: 21 & 22/26 - Florentine Slice and Christmas Mince Pies

Florentine Slice and Christmas mince pies I love baking for Christmas, and luckily I have a husband with a sweet tooth like mine who loves to eat my baking.  Win, win.  I bake, and someone else can eat most of it!  This year we will be hosting some of Alex's family for morning tea on Christmas day, so I thought I should make some special festive treats.  These two recipes are favourite Christmas treats in our house.


Florentine Slice

Florentine Slice
An easier version of the traditional Florentine biscuit.  The recipe originally came from one of my mum's Australian Women's Weekly cookbooks, but I have adapted it to be vegan.  The key ingredient is soy condensed milk, which I buy online from the Cruelty Free Shop in Auckland.   I have not tried to make my own soy condensed milk, but I understand it is not too tricky to make, so that might be a project for next year.

400g vegan dark chocolate (I use Whitakkers Dark Ghana or Bittersweet Block)
1 1/2 cups sultanas
4 cups crushed cornflakes (crush lightly in a bag, then measure out)
1 cup unsalted roasted peanuts
120g red glace cherries, chopped
1 tin Soymilke soy condensed milk

1. Prepare two 28cm x 18cm slice tins by lining with tinfoil and greasing lightly.  Preheat oven to 190degC.

2. Melt chocolate in a double boiler or in a microwave jug, stirring until smooth. Pour half the chocolate into each tin and spread out evenly.  Refrigerate until set.

3.  Combine all other ingredients in a large bowl.  When chocolate is set, spread mixure evenly over chocolate.

4. Bake for 15-20 mins until just starting to brown.  Leave in tin to cool.  When cool, cut into squares with serrated knife.

Makes about 48 squares.  Freezes well.

Note:
I find that sometimes the chocolate bubbles slightly from being baked.  The original recipe called for cooking chocolate, which I guess can cope with being baked.  After researching similar recipes online, next year I will try to bake the topping first and then "ice" the bottom of the slice with the melted chocolate after baking, to preserve the look of the chocolate.  Despite the bubbles, it is still as rich and chewy and delicious as ever!


Vegan Christmas Mince Pies

Christmas mince pies 
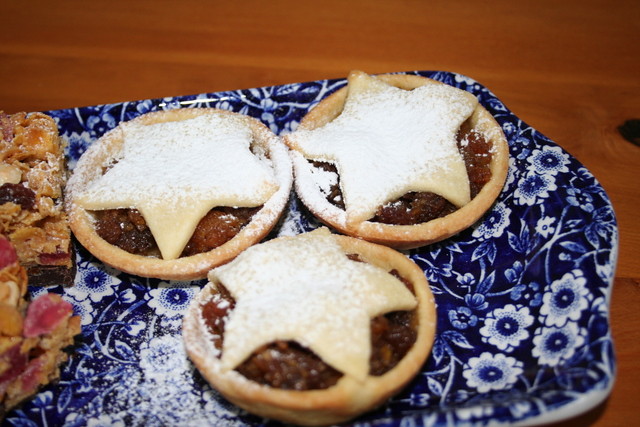
For this recipe you definitely need a food processor for both the fruit mince and the pastry.

I used Alison Holst's easy fruit mince recipe, online here.  The only change I made was to substitute chopped dried apricots for the mixed dried fruit as I am not a huge fan of mixed peel.  The recipe made enough fruit mince for just over 3 dozen pies (made in normal muffin tins).

For the pastry I used this recipe.  A single batch made enough for 12 mince pies.  I cut the bases out using an 8cm diameter round cookie cutter and the tops using a 7cm star cookie cutter.  I sprayed the muffin tins, put in the pastry bases, put in a dollop of fruit mince and popped a star on top.  I brushed the tops with a little soy milk and baked them at 180degC for 15-17 minutes.  Cool in the tins, then take out and cool on wire racks.  Sprinkle with icing sugar just before serving.

Tuesday, 17 December 2013

{26 Things I Made}: 19 & 20/26 - turtle shells and turtle eyes

Our junior show for the Year 0-2 classes (aged 5-7 years) was a couple of weeks ago.  The theme was Commotion in the Ocean.  My class of 20 Year 2 children were given Sea Turtles as our animal.  I had a few offers of help with costumes from parents in my class, but most of them did not have sewing machines.  I enlisted a mum to help with painting the turtle shells and the rest I did myself.

Turtle shells - an oval on the front and an oval cushion on the back, joined with elastic straps at the shoulders and waist

Turtle costumes

Turtle costumes


Turtle eyes - I painted polystyrene balls and glued these to black headbands

Turtle eyes

And here are a couple of shots of the costume on a child so you can see the final effect.  I was pretty pleased with how they turned out.  The kids looked so cute and performed so well.  There were a lot of dance moves to remember, but they were all stars!


I'm still hoping to get to 26 things this year.  I have a few more projects in the works to show you before the New Year, so expect some more posts once school is finished for the year on Thursday!

Sunday, 8 December 2013

{26 Things I Made} 18/26

A new ironing board cover.  Not a very exciting project, but one that was desperately needed as you can see from these before and after shots.  I am almost too ashamed to post the before picture, but it really helps you to appreciate the new cover, so it's here for all to see.  I bought some new felt to line the new cover and used the old cover as a pattern to cut the new one.  Much better.


Saturday, 7 December 2013

{26 Things I Made}: 16 + 17/26 - Christmas craft

I finished the Turtle costumes for the school show and they looked so cute!  I will be back soon to share some pictures, but in the meantime here is the first of the Christmas crafting.

Some new bunting for the lounge.  I made some bunting last year, but never blogged it and I wanted to make some more this year so that both of our fireplaces had festive bunting.  I used the largest size from the template here and made it double sided.  I cut the striped fabric on the bias to make the ribbon at the top because I wanted it to look a bit like candy canes.

Christmas bunting

A Christmas ribbon wreath.  I actually made this in January but haven't blogged it until now.  I had it on last year's Christmas craft list and I didn't get it finished in time for Christmas day, but I was determined to finish it in the New Year.  I used the instructions here.  It was simple, but time consuming to cut the ribbons, sew them into loops and then glue them onto the wreath form.  I wrapped the polysterene wreath form with ribbon first and then made the hanging loop before I started gluing.

Ribbon wreath

 I struggled with where to hang the wreath. Didn't want it exposed to the elements on our front door, or hanging outwards on a window where we couldn't see it. Then I saw some mantles on Pinterest that had wreaths hanging over the mirror and decided that would be the perfect place. I love how Christmassy our fireplace looks now! Christmas fireplace

Sunday, 10 November 2013

{26 Things I Made}: 14 + 15/26

I am well behind on this project, but I am still hopeful of finishing 26 things by the end of the year.  Term 4 is proving to be quite busy, with end-of-year reports and a junior end-of-year show item to teach to my class, plus sewing the 21 turtle costumes for the children to wear!  I am about to make my prototype turtle costume, so I will be back to share that hopefully next weekend.  In the meantime, here are a couple of baby cardigans for the gift drawer that I knitted in the last school holidays.

14/26: Grey Leaves Cardigan 
Ravelry details here
I am really pleased with how this turned out.  I significantly changed the original pattern to make the lace leaves shorter and make the body less flared.  I used self-cover buttons and I love the pop of colour that the pink polka dots give the grey.
Grey Leaves Cardigan


15/26: Raspberry In Threes Cardigan 
Ravelry details here
Another In Threes cardigan.  I do love how easy this pattern is - knitted in one piece from the top down, with no seaming and minimal ends to sew in.  The buttons are also self-cover ones, using a scrap of cute cherry fabric.

IRaspberry In Threes Cardigan

Monday, 23 September 2013

{26 Things I Made}: 12 + 13/26

I am way behind on my {26 Things I Made}, but am hoping to catch up a bit in the upcoming school holidays and also with some Christmas crafting I have planned. Here are the latest two additions, some more baby knitting to add to the baby gifts box.

 Some cute Mary-Jane booties to match the In Threes cardigan I made earlier in the year:
(Ravelry link)

Mary-Jane booties

A wee striped Puerperium cardigan, perfect for little babes, as it buttons right down the side, so you don't need to worry about pulling it over their head:
(Ravelry link) Striped cardigan Striped cardigan

Sunday, 21 July 2013

{26 Things I Made} 11/26: More Slippers

Another pair of knitted slippers - these were a birthday present for Alex.  He has been wearing them round the house at every opportunity since I finished them a couple of days ago.  It's so nice when your craft is well received!


Knitted Slippers
Ravelry details here.

Tuesday, 9 July 2013

{26 Things I Made} 10/26 A birthday present

My lovely friend Fi celebrated her birthday this last weekend with High Tea at Martha's Pantry.  I'd never had high tea before and it didn't disappoint, with lots of amazing treats and different teas to try.  She made sure to let them know I was vegan and they whipped up this lovely cake-stand full of sweet and savoury treats all for me (top tip - if you are the only vegan, you get a stand all to yourself!).

Vegan High Tea at Martha's Pantry

As a birthday present for her I made this cosmetics purse (though you could use it for other things too).  It has a nylon lining to help prevent makeup messes and the outside is made from some favourite Japanese fabric I picked up in Melbourne a couple of years ago.  I interlined it with cotton quilt batting to give it a bit more structure because the outer fabric is pretty thin.  I really like the end result and am thinking I could do with one for me too (and maybe some to sell in my Felt shop - a job for the school holidays I think).Makeup bag

Sunday, 30 June 2013

{26 Things I Made} 9/26: Baby Bibs

Some more gifts for new babies.  They have two snaps on the neck so they are adjustable and can be used for longer.  I have been making these bibs for years and they are always gratefully received and well used by the mamas I have gifted them to.  I made doubles of some of these which I will try and list in my very neglected Felt Shop in the next few days.

Baby bibs

Wednesday, 26 June 2013

{26 Things I Made}: 8/26 Taggie Toys

Some more dinosaur taggies from this pattern and some cloud taggies, inspired by this and this.  The backs of the cloud taggies have some cute cloud fabric that I got from Spotlight ages ago that has been in my stash waiting for the right project.  I saw the cloud cushion on Pinterest, thought of my cloud fabric and it all clicked.  These toys all have a small rattle insert inside so they double as rattles as well as tag toys.  The clouds have a loop of ribbon at the top so they can be hung from a baby gym or above a buggy or cot.  All are gifts for sweet new babies that have recently arrived or are about to arrive.

Cloud and Dinosaur taggie toys Back of cloud taggie

Monday, 24 June 2013

{26 Things I Made} 6/26 and 7/26: some crafting for me

I actually finished both of these before we went to Boston in April, but have only just got around to taking photos and posting them.

6/26: Knitted Slippers

Knitted SlippersMade from the popular Aunt Maggies Slipper's pattern.  Ravelry details here.  I knitted these to take away with us on holiday and they were fantastic - I wore them on the plane and around our hotel rooms.  Very warm, squishy and comfortable.  Perfect to squash into your suitcase.  And also great to wear around the house.  I have always worn shoe-type slippers that you can walk in outside to the washing line or to the letterbox, but I think these slippers may convert me to being a slipper-sock wearer.  Alex has asked me to knit him a pair and I think I may need to knit a second pair for me for days when these ones are in the wash, so expect to see more of these on the blog soon!


7/26: Pleated skirt

Pleated skirt

Pleated skirt

A less successful project.  I fell in love with this amazing Japanese Chrysanthemum print fabric found here and decided to recreate a favourite pleated skirt from Max that I wore lots last summer.  I used my standard a-line skirt pattern and added in some pleats to the front before I cut it out.    Somehow the pleating has affected the overall shape of the skirt and it doesn't sit quite right.  I have worn it a couple of times, but I think it needs some altering so it sits more on my waist.  Future restyle post to come I think!  But the fabric itself is lovely and I have quite a bit leftover for pockets or binding on other projects.

Wednesday, 22 May 2013

{26 Things I Made}: 5/26 Mr Owl pincushion

A cute owl pincushion for my crafty, owl-loving cousin for her birthday.  Funny story - our birthdays are 2 weeks apart and when we exchanged gifts we discovered that we had both given each other a handmade pincushion and bird-themed jewellery.  Great minds think alike!


Mr Owl pincushion

The pattern is from here, though I modified the construction slightly.

Monday, 8 April 2013

{26 Things I Made} 4/26

Dino Taggie Toy

Made for my new nephew, Benjamin.  A simple wee taggie Stegosaurus (a Tagosaurus perhaps?) toy using this pattern.  I would have preferred a less psychedelic shade of green, but this was the most suitable dinosaur-coloured fleece at my local fabric shop.  I embroidered the eyes and put a rattle insert inside when I stuffed him.  The rattle inserts are baby-safe and I double stitched the ribbons so it should be OK for a newborn.  I bought my rattle inserts on Etsy, but local Wellington peeps might be interested to know that I've since discovered them at Pete's Emporium in Porirua.  They are small sealed plastic containers that have a few balls inside.  A good way to turn a simple small softie into a baby's rattle.

Tuesday, 26 March 2013

{26 Things I Made}: 3/26 Milo Monkey

Milo Monkey

This guy was made for my class as a mascot.  Each week one child gets to take him home on a Friday and then write about their weekend adventures in his journal.  I'd heard about this idea from a few other teachers and thought it was great as a reward/behaviour incentive.  His name is Milo Monkey, and my class of 22 Year 2 students (aged 5 and 6) just love him! I love him too.  In fact, I did briefly consider keeping him for myself...

I used the Monkey Man pattern from the Hop Skip Jump toys book and he came together really quickly and easily.  I highly recommend this book for the clear instructions and fantastic softie patterns.  I'm considering getting my own copy (though I notice it's currently sold out on the Book Depository). I used fabrics from my stash - a brown drill for his body and cream felt for his face.  His cute overalls are from a Japanese craft cotton.  

And just because, here are some more pictures of what he got up to at my house before I took him into meet my class and live at school...


Sunday, 17 March 2013

Hello again

I didn't really mean to stop blogging for (ahem) more than two years, but you know, life got busy (teaching is lots of work!) and I wasn't crafting, so I didn't think I could post without something to show. Then I thought no-one was reading anymore, so I kinda just stopped.

But, last year, while writing a blog for my classroom, I realised I missed my own piece of blog-land.  I have still been keeping up with reading blogs, and pinning projects on pinterest.  Now I feel like getting back into the blog game.  One of my resolutions for 2013 is to make time to craft more.  Teaching is one of those jobs where there is a never-ending to-do list and I realised that I needed to let go of some things and be content that everything will not always get done.

Last year I enjoyed reading Clare's "52 Things I Made" series on Green Valley Crafts and so I've decided to do a similar series here to try and get me blogging regularly again.  I think 52 things is a bit ambitious, so I'm aiming for 26.  One per fortnight.  And to start me off, here are the first two, knitted for my future niece or nephew (who was born yesterday and turned out to be a boy, so the cardigan has gone to the "baby gifts" box).

{26 Things I Made} 1/26 + 2/26
"In Threes" cardigan - Ravelry details here


Striped Pebble Vest - Ravelry details here