Tuesday 31 December 2013

{26 Things I Made}: 25 & 26/26 - two longterm projects!

Just popping in quickly to post my final two projects for the year - twins!  They are not quite finished projects, but they were created in 2013, so I thought they qualified :)


Currently just over 14 weeks and feeling pretty good.  I was very tired and a bit nauseous in the evenings until about 13 weeks, but that seemed to be the worst of it.   No sign of the double dose of morning sickness you are supposed to get with twins.  Fingers crossed it continues that way!

The babies are due in late June, but are likely to be here sometime in late May/early June.  We are both very excited about our next big adventure as parents.  Today we have been painting the nursery and once we find out what flavours the babies are, I will make a start on some cot quilts.  Stay tuned for plenty more baby crafting next year!

Thank you for reading along this year.  Wishing you all a wonderful 2014!

Saturday 28 December 2013

{26 Things I Made}: 23 & 24/26 - clay ornaments (two ways)

I hope you all had a lovely Christmas with good food and good company.  Our Christmas day ended up being quite busy catching up with my family and Alex's family, and we have enjoyed having a quiet couple of days to potter before the next lot of visitors.  I'm quite surprised that I've managed to complete this 26 Things project with my lack of posting and crafting earlier in the year, but there was a rush of productivity just before Christmas!  Here are number 23 and 24/26.  I'll be back before the New Year to post about my last two special projects...

Baking Soda Clay Ornaments
Baking Soda Clay Ornaments I've seen recipes for baking soda clay all over pinterest and thought it looked like a pretty easy way to make some new white ornaments for the tree.  I also had an idea of making some mini clay Christmas bunting.  The dough sounded ideal (I used this recipe but made a half size batch) - three ingredients, easy to make, the clay stayed white,  you could stamp it with patterns and you could air dry or oven dry it.  Well, this is the story of a pinterest fail!  The dough worked, was lovely to roll out, and easy to stamp.  But, it cracked really badly when it dried (I chose to air dry rather than oven dry so they would dry slowly). They cracked so much that those 6 ornaments in the picture above were all that were salvageable from the entire batch of about 25!  I don't know what went wrong.  It didn't seem to be because of the thickness of the rolled out clay.  I had both thick and thin ornaments crack.  Some ornaments cracked where I had pushed a hole in the for stringing up.  Some cracked where I had stamped them.  Others cracked in random places.

Cracked Baking Soda Clay :(
The ornaments that I did manage to salvage do look lovely.  They did stay white as the instructions promised, but took about 3 days to fully dry.  I painted a couple of them and then sealed them with PVA (white glue).  The rest I covered with PVA and sprinkled with fine white glitter.  These ones are my favourites.  The white glittery stars look lovely on the tree when the fairy lights are on!


Air Dry Clay Ornaments
Air Dry Clay Bunting

Air Dry Clay Ornaments
I was still determined to make my clay bunting, so after some research online, I bought some Jovi Air Dry Clay from Warehouse Stationery.  At only $7 for 500g, I figured if this didn't work either, I wasn't going to be much out of pocket.  But it did work.  Wonderfully well in fact!  Here is my tray of ornaments ready to dry.

Air Dry Clay Ornaments
 I made a paper template for the bunting flags and cut them out with a sharp knife.  The other shapes I cut with cookie cutters.  I used rubber stamps and ordinary crafting ink to decorate them.  Two of the stars are imprinted with a doily that I rolled onto the clay before cutting them out.  They took just over 24 hours to dry fully and then I sprayed them with spray varnish before stringing them on ribbon. I only used about half a packet of dough, so I have plenty left for other projects.  The clay was not as white as the baking soda clay, but it seemed to whiten as it dried.  A much better result - I love my cute new bunting!  I think I might have to make some for birthdays and other occasions so I can have bunting hanging up year round!


Tuesday 24 December 2013

{26 Things I Made}: 21 & 22/26 - Florentine Slice and Christmas Mince Pies

Florentine Slice and Christmas mince pies I love baking for Christmas, and luckily I have a husband with a sweet tooth like mine who loves to eat my baking.  Win, win.  I bake, and someone else can eat most of it!  This year we will be hosting some of Alex's family for morning tea on Christmas day, so I thought I should make some special festive treats.  These two recipes are favourite Christmas treats in our house.


Florentine Slice

Florentine Slice
An easier version of the traditional Florentine biscuit.  The recipe originally came from one of my mum's Australian Women's Weekly cookbooks, but I have adapted it to be vegan.  The key ingredient is soy condensed milk, which I buy online from the Cruelty Free Shop in Auckland.   I have not tried to make my own soy condensed milk, but I understand it is not too tricky to make, so that might be a project for next year.

400g vegan dark chocolate (I use Whitakkers Dark Ghana or Bittersweet Block)
1 1/2 cups sultanas
4 cups crushed cornflakes (crush lightly in a bag, then measure out)
1 cup unsalted roasted peanuts
120g red glace cherries, chopped
1 tin Soymilke soy condensed milk

1. Prepare two 28cm x 18cm slice tins by lining with tinfoil and greasing lightly.  Preheat oven to 190degC.

2. Melt chocolate in a double boiler or in a microwave jug, stirring until smooth. Pour half the chocolate into each tin and spread out evenly.  Refrigerate until set.

3.  Combine all other ingredients in a large bowl.  When chocolate is set, spread mixure evenly over chocolate.

4. Bake for 15-20 mins until just starting to brown.  Leave in tin to cool.  When cool, cut into squares with serrated knife.

Makes about 48 squares.  Freezes well.

Note:
I find that sometimes the chocolate bubbles slightly from being baked.  The original recipe called for cooking chocolate, which I guess can cope with being baked.  After researching similar recipes online, next year I will try to bake the topping first and then "ice" the bottom of the slice with the melted chocolate after baking, to preserve the look of the chocolate.  Despite the bubbles, it is still as rich and chewy and delicious as ever!


Vegan Christmas Mince Pies

Christmas mince pies For this recipe you definitely need a food processor for both the fruit mince and the pastry.

I used Alison Holst's easy fruit mince recipe, online here.  The only change I made was to substitute chopped dried apricots for the mixed dried fruit as I am not a huge fan of mixed peel.  The recipe made enough fruit mince for just over 3 dozen pies (made in normal muffin tins).

For the pastry I used this recipe.  A single batch made enough for 12 mince pies.  I cut the bases out using an 8cm diameter round cookie cutter and the tops using a 7cm star cookie cutter.  I sprayed the muffin tins, put in the pastry bases, put in a dollop of fruit mince and popped a star on top.  I brushed the tops with a little soy milk and baked them at 180degC for 15-17 minutes.  Cool in the tins, then take out and cool on wire racks.  Sprinkle with icing sugar just before serving.

Tuesday 17 December 2013

{26 Things I Made}: 19 & 20/26 - turtle shells and turtle eyes

Our junior show for the Year 0-2 classes (aged 5-7 years) was a couple of weeks ago.  The theme was Commotion in the Ocean.  My class of 20 Year 2 children were given Sea Turtles as our animal.  I had a few offers of help with costumes from parents in my class, but most of them did not have sewing machines.  I enlisted a mum to help with painting the turtle shells and the rest I did myself.

Turtle shells - an oval on the front and an oval cushion on the back, joined with elastic straps at the shoulders and waist

Turtle costumes

Turtle costumes


Turtle eyes - I painted polystyrene balls and glued these to black headbands

Turtle eyes

And here are a couple of shots of the costume on a child so you can see the final effect.  I was pretty pleased with how they turned out.  The kids looked so cute and performed so well.  There were a lot of dance moves to remember, but they were all stars!


I'm still hoping to get to 26 things this year.  I have a few more projects in the works to show you before the New Year, so expect some more posts once school is finished for the year on Thursday!

Sunday 8 December 2013

{26 Things I Made} 18/26

A new ironing board cover.  Not a very exciting project, but one that was desperately needed as you can see from these before and after shots.  I am almost too ashamed to post the before picture, but it really helps you to appreciate the new cover, so it's here for all to see.  I bought some new felt to line the new cover and used the old cover as a pattern to cut the new one.  Much better.


Saturday 7 December 2013

{26 Things I Made}: 16 + 17/26 - Christmas craft

I finished the Turtle costumes for the school show and they looked so cute!  I will be back soon to share some pictures, but in the meantime here is the first of the Christmas crafting.

Some new bunting for the lounge.  I made some bunting last year, but never blogged it and I wanted to make some more this year so that both of our fireplaces had festive bunting.  I used the largest size from the template here and made it double sided.  I cut the striped fabric on the bias to make the ribbon at the top because I wanted it to look a bit like candy canes.

Christmas bunting

A Christmas ribbon wreath.  I actually made this in January but haven't blogged it until now.  I had it on last year's Christmas craft list and I didn't get it finished in time for Christmas day, but I was determined to finish it in the New Year.  I used the instructions here.  It was simple, but time consuming to cut the ribbons, sew them into loops and then glue them onto the wreath form.  I wrapped the polysterene wreath form with ribbon first and then made the hanging loop before I started gluing.

Ribbon wreath

 I struggled with where to hang the wreath. Didn't want it exposed to the elements on our front door, or hanging outwards on a window where we couldn't see it. Then I saw some mantles on Pinterest that had wreaths hanging over the mirror and decided that would be the perfect place. I love how Christmassy our fireplace looks now! Christmas fireplace

Sunday 10 November 2013

{26 Things I Made}: 14 + 15/26

I am well behind on this project, but I am still hopeful of finishing 26 things by the end of the year.  Term 4 is proving to be quite busy, with end-of-year reports and a junior end-of-year show item to teach to my class, plus sewing the 21 turtle costumes for the children to wear!  I am about to make my prototype turtle costume, so I will be back to share that hopefully next weekend.  In the meantime, here are a couple of baby cardigans for the gift drawer that I knitted in the last school holidays.

14/26: Grey Leaves Cardigan 
Ravelry details here
I am really pleased with how this turned out.  I significantly changed the original pattern to make the lace leaves shorter and make the body less flared.  I used self-cover buttons and I love the pop of colour that the pink polka dots give the grey.
Grey Leaves Cardigan


15/26: Raspberry In Threes Cardigan 
Ravelry details here
Another In Threes cardigan.  I do love how easy this pattern is - knitted in one piece from the top down, with no seaming and minimal ends to sew in.  The buttons are also self-cover ones, using a scrap of cute cherry fabric.

IRaspberry In Threes Cardigan

Monday 4 November 2013

Tiny Eyes doll giveaway!

I have a few completed projects to share with you soon, but in the meantime - check out this amazing giveaway from Tiny Eyes.  The super-talented Dee is giving away the 100th doll she has made this year, and she is gorgeous!  Visit the Tiny Eyes facebook page here for more details.


Monday 23 September 2013

{26 Things I Made}: 12 + 13/26

I am way behind on my {26 Things I Made}, but am hoping to catch up a bit in the upcoming school holidays and also with some Christmas crafting I have planned. Here are the latest two additions, some more baby knitting to add to the baby gifts box.

 Some cute Mary-Jane booties to match the In Threes cardigan I made earlier in the year:
(Ravelry link)

Mary-Jane booties

A wee striped Puerperium cardigan, perfect for little babes, as it buttons right down the side, so you don't need to worry about pulling it over their head:
(Ravelry link) Striped cardigan Striped cardigan

Sunday 1 September 2013

Shop restocked!

I have been meaning to upload some things to my much neglected Felt shop and today was the day I finally got around to it.  I've added some bibs, baby dresses and other bits and pieces.  Click on the image to be taken to the shop.


Sunday 28 July 2013

Vegan Chocolate Cupcakes

Vegan Chocolate Cupcakes

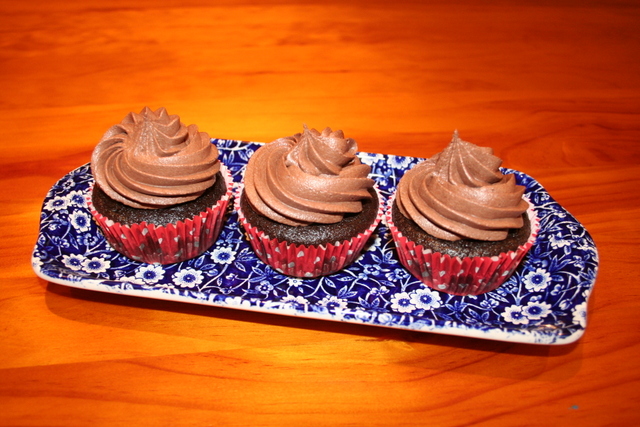
Alex and I tag-teamed in the kitchen a couple of weeks ago to make some chocolate cupcakes for him to take to work for his birthday.  I realised that I hadn't shared these recipes on my blog, so here they are for all you chocolate freaks, my favourite chocolate cupcake and icing recipes.  I have made these countless times for work morning teas, birthday parties, celebrations or just because I needed a chocolate hit. This makes light, chocolatey, moist cupcakes or cake.  And the icing is rich, fluffy and lick-the-bowl-icious.  Who needs eggs and dairy?

Vegan Chocolate Cupcakes

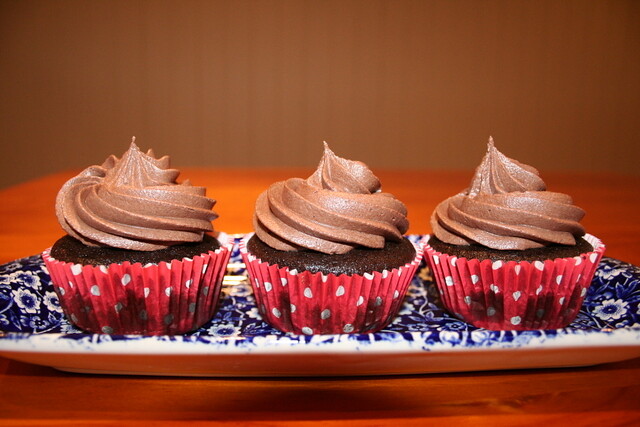
Vegan Chocolate Cupcakes (or Cake)
(adapted from Vegan Cupcakes Take Over the World)
Makes 12 cupcakes.  Can be easily halved to make 6 cupcakes (if you want a chocolate hit, but don't want to make a whole batch!)

1 cup soy milk
1 teaspoon apple cider vinegar (you can use white vinegar if you don't have ACV)
3/4 cup white sugar
1/3 cup canola oil
1 1/2 teaspoons vanilla extract
1 cup white flour
1/3 cup cocoa powder (I use Sun Valley brand)
3/4 teaspoon baking soda
1/2 teaspoon baking powder
1/4 teaspoon salt

1. Preheat oven to 180 degC and line a muffin pan with cupcake liners.

2. Whisk together the soy milk and vinegar in a large bowl, and set aside for a few minutes to curdle. Add the sugar, oil and vanilla to the soy milk mixture and beat until foamy. 

3. In a separate bowl, sift together the flour, cocoa powder, baking soda, baking powder, and salt. Add in two batches to wet ingredients and beat until no large lumps remain (a few tiny lumps are OK).  

4. Pour into liners, filling 3/4 of the way. Bake 18 to 20 minutes, until a toothpick inserted into the center comes out clean. Transfer to a cooling rack and let cool completely before icing.

Notes: 
1. I have made these at different times using my kenwood mixer, hand held mixer and just beating by hand.  I have found that the cupcakes were much fluffier and moister when I used a mixer to beat the mixture rather than just mixing by hand. 

2. To make a cake, pour mixture into a greased 20-23cm round cake tin and bake for 32-35 minutes until a toothpick inserted in the centre comes out clean.  If you want to make a layer cake, double the recipe and make two cakes and then sandwich with some icing or jam or stewed berries in the middle. You may need extra icing for a layer cake.


Chocolate Buttercream Icing
(adapted from The Joy of Vegan Baking)

1/2 cup (112g) non-dairy butter (in NZ use Olivani or Olivite)
3 cups icing sugar, sifted
1/3 cup cocoa (I use Sun Valley brand - much richer than Cadbury or Nestle)
1 tsp vanilla essence 
3-4 tbsp water or non-dairy milk

With an electric mixer, cream the butter until smooth.  With the mixer on low speed, add the icing sugar and cream for about 2 minutes.  Add the cocoa, vanilla and milk/water and turn the mixer to high speed once all the ingredients are relatively well combined.  Beat on high speed until the frosting is light and fluffy, about 3 minutes. Add 1-2 tbsp (15-30ml) more milk if it is too dry.  Pipe or spread onto cupcakes or cakes.  Lick the bowl and the beaters afterwards!

Makes enough for one 23cm cake or about 12 cupcakes piped. If you are not going to pipe the icing on your cupcakes, you could probably halve the recipe, but when it comes to cupcakes, the more icing the better!

Sunday 21 July 2013

{26 Things I Made} 11/26: More Slippers

Another pair of knitted slippers - these were a birthday present for Alex.  He has been wearing them round the house at every opportunity since I finished them a couple of days ago.  It's so nice when your craft is well received!


Knitted Slippers
Ravelry details here.

Tuesday 9 July 2013

{26 Things I Made} 10/26 A birthday present

My lovely friend Fi celebrated her birthday this last weekend with High Tea at Martha's Pantry.  I'd never had high tea before and it didn't disappoint, with lots of amazing treats and different teas to try.  She made sure to let them know I was vegan and they whipped up this lovely cake-stand full of sweet and savoury treats all for me (top tip - if you are the only vegan, you get a stand all to yourself!).

Vegan High Tea at Martha's Pantry

As a birthday present for her I made this cosmetics purse (though you could use it for other things too).  It has a nylon lining to help prevent makeup messes and the outside is made from some favourite Japanese fabric I picked up in Melbourne a couple of years ago.  I interlined it with cotton quilt batting to give it a bit more structure because the outer fabric is pretty thin.  I really like the end result and am thinking I could do with one for me too (and maybe some to sell in my Felt shop - a job for the school holidays I think).Makeup bag

Sunday 30 June 2013

{26 Things I Made} 9/26: Baby Bibs

Some more gifts for new babies.  They have two snaps on the neck so they are adjustable and can be used for longer.  I have been making these bibs for years and they are always gratefully received and well used by the mamas I have gifted them to.  I made doubles of some of these which I will try and list in my very neglected Felt Shop in the next few days.

Baby bibs

Wednesday 26 June 2013

{26 Things I Made}: 8/26 Taggie Toys

Some more dinosaur taggies from this pattern and some cloud taggies, inspired by this and this.  The backs of the cloud taggies have some cute cloud fabric that I got from Spotlight ages ago that has been in my stash waiting for the right project.  I saw the cloud cushion on Pinterest, thought of my cloud fabric and it all clicked.  These toys all have a small rattle insert inside so they double as rattles as well as tag toys.  The clouds have a loop of ribbon at the top so they can be hung from a baby gym or above a buggy or cot.  All are gifts for sweet new babies that have recently arrived or are about to arrive.

Cloud and Dinosaur taggie toys Back of cloud taggie

Monday 24 June 2013

Chocolate Peppermint Slice

Chocolate Peppermint slice

I had to make something for a morning tea at work and had pinned a couple of Chocolate Peppermint Slice recipes that I thought I might be able to adapt to make them vegan.  Mint + Chocolate is one of my favourite flavour combinations, but I've not had Peppermint Slice since I became vegan.

This recipe is a result of combining a couple of recipes and adjusting some quantities.  The slice was a great hit, both at work and with my favourite baking-tester (Alex).  Here is the recipe in case you would like to try it too.  Beware, it is very rich and sweet, so small pieces are a must!

Chocolate Peppermint Slice
Makes approx 48 pieces

For the base:
1 ½ cups self raising flour

2 tablespoons cocoa

1 cup dessicated coconut

½ cup brown sugar
, firmly packed
125g vegan margarine, melted

Filling
:
60g Kremelta, melted

4 cups icing sugar

4 tablespoons soy milk
1 teaspoon peppermint essence


Chocolate topping:
200g dark chocolate

50g Kremelta

Method:
Preheat oven to 180°C. Butter a 16cm x 26cm slice tray. Combine flour, cocoa, coconut and brown sugar in a bowl, stir in melted margarine and mix until well combined. Press mixture into slice tray and bake for 10-15 minutes until starting to brown. Remove from oven and cool slightly. Do not overcook as you don't want it to be too crumbly.

To make filling, place icing sugar in a small bowl, stir in melted Kremelta, soy milk and peppermint essence. Spread filling over warm base using a spatula or the back of a warm spoon. Place tray in fridge for about 30 minutes until filling is cold.

To make the topping, melt Kremelta and chocolate together either in a microwave proof jug or in a bowl over hot water.  Stir until smooth. Pour chocolate over peppermint filling - you can tip the tray from side to side to get it evenly covered.   Leave at room temperature to set and then slice into squares.   Use a sharp warm knife (run under hot water then dry) to cut the slice - the warm knife helps you to cut the chocolate without it cracking.

Eat, go into a sugar coma.  Come back for round 2.

{26 Things I Made} 6/26 and 7/26: some crafting for me

I actually finished both of these before we went to Boston in April, but have only just got around to taking photos and posting them.

6/26: Knitted Slippers

Knitted SlippersMade from the popular Aunt Maggies Slipper's pattern.  Ravelry details here.  I knitted these to take away with us on holiday and they were fantastic - I wore them on the plane and around our hotel rooms.  Very warm, squishy and comfortable.  Perfect to squash into your suitcase.  And also great to wear around the house.  I have always worn shoe-type slippers that you can walk in outside to the washing line or to the letterbox, but I think these slippers may convert me to being a slipper-sock wearer.  Alex has asked me to knit him a pair and I think I may need to knit a second pair for me for days when these ones are in the wash, so expect to see more of these on the blog soon!


7/26: Pleated skirt

Pleated skirt

Pleated skirt

A less successful project.  I fell in love with this amazing Japanese Chrysanthemum print fabric found here and decided to recreate a favourite pleated skirt from Max that I wore lots last summer.  I used my standard a-line skirt pattern and added in some pleats to the front before I cut it out.    Somehow the pleating has affected the overall shape of the skirt and it doesn't sit quite right.  I have worn it a couple of times, but I think it needs some altering so it sits more on my waist.  Future restyle post to come I think!  But the fabric itself is lovely and I have quite a bit leftover for pockets or binding on other projects.

Sunday 16 June 2013

Another amazing giveway

For those of you who love beautifully-made NZ-made clothing (doesn't everyone?), you should really check out Sailor Spy.  I don't yet own any of their pieces, but I am a regular visitor to their online shop and have lots of their items in my dream-wardrobe.  So you can imagine my excitement when I discovered that Stella is hosting a giveaway for a $75 Sailor Spy voucher!  Woop!  Get yourself over there and enter now!


Sunday 26 May 2013

Hottest Home Baker Challenge Week 2: Vegan Afghan Biscuits

Vegan Afghan Biscuits

The challenge this week was to bake 3 things in 2 hours that would appeal to children and be suitable to sell at a school gala.  The contestants had to bake their first item in 45 mins.  If you didn't see the show, you can watch it on demand here.

I decided to just make one item in 45 minutes.  To help me decide what to bake, I conducted a some quick market research with my ready-made focus group a.k.a. my class of Year 2 (aged 6-7) children.  I asked them what baking they would buy at a gala.  After quite an animated discussion (lesson for next time - make the topic of discussion edible and all children will be engaged!), the most popular turned out to be cookies with coloured icing and sprinkles or lollies on top.  Cake pops and cupcakes came in a close second, but I didn't think I would be able to make and decorate them in 45 mins.  I considered shortbread or gingerbread men (one girl in my class said she only liked "gingerbread ladies, not gingerbread men"!), but settled on a New Zealand classic - Afghan Biscuits.  Alex needed something to take to work for a morning tea on Monday and I thought I could adapt Afghans to make them appeal to kids as well as adults.

The recipe I used is adapted from the Edmonds cookbook and is below.  It is a quick and easy recipe and makes a lovely rich and chocolatey biscuit.

The only change I made to the adults version was to top them with almonds as I didn't have any walnuts.  The kids versions were topped with raspberry icing (made with icing sugar, raspberry essence and a bit of water - sickly sweet but bright enough to appeal to kids I think) and rainbow sprinkles.

Vegan Afghan Biscuits

Vegan Afghan Biscuits

  Vegan Afghan Biscuits
(Makes 18 biscuits)

175g vegan margarine (I used Olivani)
1/3 cup caster sugar
1 1/4 c white flour
1/2 c cocoa
1 1/2 c cornflakes
Walnut halves to decorate

Pre-heat oven to 180 deg C.  Grease an oven tray.  Cream margarine and sugar together until it lightens in colour and is fluffy.  Beat in sifted flour and cocoa to make a stiff dough.  Check the dough holds together by pressing a small handful of crumbs together.  If it is too crumbly, add a tablespoon or two of soy milk to the dough.  Add cornflakes and mix through evenly.  Roll tablespoonsful of mixture into balls and put on greased tray.  Flatten slightly with the back of a fork.  They do not spread during cooking, so you can place them close together.  Bake for 12-15 mins.  Cool on tray for 5 minutes then transfer to cooling racks.  When cold ice with chocolate icing (see recipe below) and press a walnut half into the icing.

Chocolate icing
2 c icing sugar
2 heaped tbsp cocoa
2 tsp vegan margarine
1/4 tsp vanilla essence
1-2 tbsp hot water

Sift icing sugar and cocoa into a bowl.  Put margarine, vanilla and 1tbsp water into a small bowl or mug and stir until margarine is melted (it may help to microwave it for 10 seconds or so).  Pour into the icing sugar and cocoa.  Stir to make a spreadable icing, adding more water (a tsp at a time) to get desired consistency.

Saturday 25 May 2013

Amazing giveaway!


Look at all of the crafty goodness you can win. That fox dress is seriously amazing!  Although I'm not a mama yet, I am an aunty that likes to spoil her niece and nephews, and there is plenty here to help you reach favourite aunty status.  Plus lots of things for aunties to keep for themselves too :)

Get yourself over there now and enter.


Wednesday 22 May 2013

{26 Things I Made}: 5/26 Mr Owl pincushion

A cute owl pincushion for my crafty, owl-loving cousin for her birthday.  Funny story - our birthdays are 2 weeks apart and when we exchanged gifts we discovered that we had both given each other a handmade pincushion and bird-themed jewellery.  Great minds think alike!


Mr Owl pincushion

The pattern is from here, though I modified the construction slightly.

Sunday 19 May 2013

Hottest Home Baker Challenge Week 1: Vegan Empanadas

New Zealand's Hottest Home Baker has just started again on TV.  I don't watch a lot of TV, and hardly any reality TV, but this show really appeals to me (along with Project Runway of course!).  I decided this year that I would play along and try to follow the challenges at home each week, which would give me an excuse to bake more and maybe try some new recipes.

The first episode challenge was to bake a sweet or savoury dish in 90 minutes.  Each contestant randomly chose a sweet or savoury card, but I decided to opt for savoury since I always bake sweet dishes.  I was inspired by one of the contestants to try Empanadas, something I'd never baked before.  After some research, I decided on Roasted Acorn Squash and Black Bean Empanadas from the Veganomicon, transcribed here.

I subbed Crown pumpkin for Acorn Squash, but followed the rest of the recipe pretty closely, except that I cut in the vegetable shortening using my food processor.  They took me longer than 90 minutes, so I failed on the time limit rule.  But my impartial judge (Alex) declared them delicious and devoured them for dinner.  I have to agree that the combination of sweet pumpkin and red onion with black beans and a bit of spicy heat made for a delicious filling.  The pastry was simple to make and I'll definitely try these again and experiment with different fillings.


Pumpkin diced
Diced pumpkin

Mixing the dough
Mixing the dough

Filling the dough
Filling the dough

Ready for the oven
Ready for the oven

Fresh out of the oven

Yum yum!
Yum, yum!