Monday, 24 June 2013

Chocolate Peppermint Slice

Chocolate Peppermint slice

I had to make something for a morning tea at work and had pinned a couple of Chocolate Peppermint Slice recipes that I thought I might be able to adapt to make them vegan.  Mint + Chocolate is one of my favourite flavour combinations, but I've not had Peppermint Slice since I became vegan.

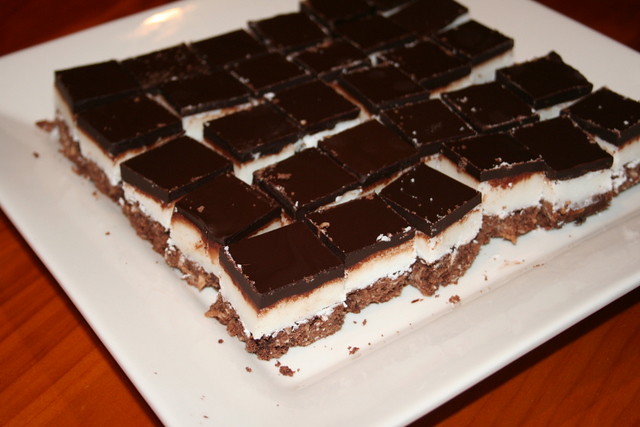
This recipe is a result of combining a couple of recipes and adjusting some quantities.  The slice was a great hit, both at work and with my favourite baking-tester (Alex).  Here is the recipe in case you would like to try it too.  Beware, it is very rich and sweet, so small pieces are a must!

Chocolate Peppermint Slice
Makes approx 48 pieces

For the base:
1 ½ cups self raising flour

2 tablespoons cocoa

1 cup dessicated coconut

½ cup brown sugar
, firmly packed
125g vegan margarine, melted

Filling
:
60g Kremelta, melted

4 cups icing sugar

4 tablespoons soy milk
1 teaspoon peppermint essence


Chocolate topping:
200g dark chocolate

50g Kremelta

Method:
Preheat oven to 180°C. Butter a 16cm x 26cm slice tray. Combine flour, cocoa, coconut and brown sugar in a bowl, stir in melted margarine and mix until well combined. Press mixture into slice tray and bake for 10-15 minutes until starting to brown. Remove from oven and cool slightly. Do not overcook as you don't want it to be too crumbly.

To make filling, place icing sugar in a small bowl, stir in melted Kremelta, soy milk and peppermint essence. Spread filling over warm base using a spatula or the back of a warm spoon. Place tray in fridge for about 30 minutes until filling is cold.

To make the topping, melt Kremelta and chocolate together either in a microwave proof jug or in a bowl over hot water.  Stir until smooth. Pour chocolate over peppermint filling - you can tip the tray from side to side to get it evenly covered.   Leave at room temperature to set and then slice into squares.   Use a sharp warm knife (run under hot water then dry) to cut the slice - the warm knife helps you to cut the chocolate without it cracking.

Eat, go into a sugar coma.  Come back for round 2.

{26 Things I Made} 6/26 and 7/26: some crafting for me

I actually finished both of these before we went to Boston in April, but have only just got around to taking photos and posting them.

6/26: Knitted Slippers

Knitted SlippersMade from the popular Aunt Maggies Slipper's pattern.  Ravelry details here.  I knitted these to take away with us on holiday and they were fantastic - I wore them on the plane and around our hotel rooms.  Very warm, squishy and comfortable.  Perfect to squash into your suitcase.  And also great to wear around the house.  I have always worn shoe-type slippers that you can walk in outside to the washing line or to the letterbox, but I think these slippers may convert me to being a slipper-sock wearer.  Alex has asked me to knit him a pair and I think I may need to knit a second pair for me for days when these ones are in the wash, so expect to see more of these on the blog soon!


7/26: Pleated skirt

Pleated skirt

Pleated skirt

A less successful project.  I fell in love with this amazing Japanese Chrysanthemum print fabric found here and decided to recreate a favourite pleated skirt from Max that I wore lots last summer.  I used my standard a-line skirt pattern and added in some pleats to the front before I cut it out.    Somehow the pleating has affected the overall shape of the skirt and it doesn't sit quite right.  I have worn it a couple of times, but I think it needs some altering so it sits more on my waist.  Future restyle post to come I think!  But the fabric itself is lovely and I have quite a bit leftover for pockets or binding on other projects.

Sunday, 16 June 2013

Another amazing giveway

For those of you who love beautifully-made NZ-made clothing (doesn't everyone?), you should really check out Sailor Spy.  I don't yet own any of their pieces, but I am a regular visitor to their online shop and have lots of their items in my dream-wardrobe.  So you can imagine my excitement when I discovered that Stella is hosting a giveaway for a $75 Sailor Spy voucher!  Woop!  Get yourself over there and enter now!


Sunday, 26 May 2013

Hottest Home Baker Challenge Week 2: Vegan Afghan Biscuits

Vegan Afghan Biscuits

The challenge this week was to bake 3 things in 2 hours that would appeal to children and be suitable to sell at a school gala.  The contestants had to bake their first item in 45 mins.  If you didn't see the show, you can watch it on demand here.

I decided to just make one item in 45 minutes.  To help me decide what to bake, I conducted a some quick market research with my ready-made focus group a.k.a. my class of Year 2 (aged 6-7) children.  I asked them what baking they would buy at a gala.  After quite an animated discussion (lesson for next time - make the topic of discussion edible and all children will be engaged!), the most popular turned out to be cookies with coloured icing and sprinkles or lollies on top.  Cake pops and cupcakes came in a close second, but I didn't think I would be able to make and decorate them in 45 mins.  I considered shortbread or gingerbread men (one girl in my class said she only liked "gingerbread ladies, not gingerbread men"!), but settled on a New Zealand classic - Afghan Biscuits.  Alex needed something to take to work for a morning tea on Monday and I thought I could adapt Afghans to make them appeal to kids as well as adults.

The recipe I used is adapted from the Edmonds cookbook and is below.  It is a quick and easy recipe and makes a lovely rich and chocolatey biscuit.

The only change I made to the adults version was to top them with almonds as I didn't have any walnuts.  The kids versions were topped with raspberry icing (made with icing sugar, raspberry essence and a bit of water - sickly sweet but bright enough to appeal to kids I think) and rainbow sprinkles.

Vegan Afghan Biscuits

Vegan Afghan Biscuits

  Vegan Afghan Biscuits
(Makes 18 biscuits)

175g vegan margarine (I used Olivani)
1/3 cup caster sugar
1 1/4 c white flour
1/2 c cocoa
1 1/2 c cornflakes
Walnut halves to decorate

Pre-heat oven to 180 deg C.  Grease an oven tray.  Cream margarine and sugar together until it lightens in colour and is fluffy.  Beat in sifted flour and cocoa to make a stiff dough.  Check the dough holds together by pressing a small handful of crumbs together.  If it is too crumbly, add a tablespoon or two of soy milk to the dough.  Add cornflakes and mix through evenly.  Roll tablespoonsful of mixture into balls and put on greased tray.  Flatten slightly with the back of a fork.  They do not spread during cooking, so you can place them close together.  Bake for 12-15 mins.  Cool on tray for 5 minutes then transfer to cooling racks.  When cold ice with chocolate icing (see recipe below) and press a walnut half into the icing.

Chocolate icing
2 c icing sugar
2 heaped tbsp cocoa
2 tsp vegan margarine
1/4 tsp vanilla essence
1-2 tbsp hot water

Sift icing sugar and cocoa into a bowl.  Put margarine, vanilla and 1tbsp water into a small bowl or mug and stir until margarine is melted (it may help to microwave it for 10 seconds or so).  Pour into the icing sugar and cocoa.  Stir to make a spreadable icing, adding more water (a tsp at a time) to get desired consistency.

Saturday, 25 May 2013

Amazing giveaway!


Look at all of the crafty goodness you can win. That fox dress is seriously amazing!  Although I'm not a mama yet, I am an aunty that likes to spoil her niece and nephews, and there is plenty here to help you reach favourite aunty status.  Plus lots of things for aunties to keep for themselves too :)

Get yourself over there now and enter.


Wednesday, 22 May 2013

{26 Things I Made}: 5/26 Mr Owl pincushion

A cute owl pincushion for my crafty, owl-loving cousin for her birthday.  Funny story - our birthdays are 2 weeks apart and when we exchanged gifts we discovered that we had both given each other a handmade pincushion and bird-themed jewellery.  Great minds think alike!


Mr Owl pincushion

The pattern is from here, though I modified the construction slightly.

Sunday, 19 May 2013

Hottest Home Baker Challenge Week 1: Vegan Empanadas

New Zealand's Hottest Home Baker has just started again on TV.  I don't watch a lot of TV, and hardly any reality TV, but this show really appeals to me (along with Project Runway of course!).  I decided this year that I would play along and try to follow the challenges at home each week, which would give me an excuse to bake more and maybe try some new recipes.

The first episode challenge was to bake a sweet or savoury dish in 90 minutes.  Each contestant randomly chose a sweet or savoury card, but I decided to opt for savoury since I always bake sweet dishes.  I was inspired by one of the contestants to try Empanadas, something I'd never baked before.  After some research, I decided on Roasted Acorn Squash and Black Bean Empanadas from the Veganomicon, transcribed here.

I subbed Crown pumpkin for Acorn Squash, but followed the rest of the recipe pretty closely, except that I cut in the vegetable shortening using my food processor.  They took me longer than 90 minutes, so I failed on the time limit rule.  But my impartial judge (Alex) declared them delicious and devoured them for dinner.  I have to agree that the combination of sweet pumpkin and red onion with black beans and a bit of spicy heat made for a delicious filling.  The pastry was simple to make and I'll definitely try these again and experiment with different fillings.


Pumpkin diced
Diced pumpkin

Mixing the dough
Mixing the dough

Filling the dough
Filling the dough

Ready for the oven
Ready for the oven

Fresh out of the oven

Yum yum!
Yum, yum!

Monday, 13 May 2013

home again

We arrived back home last weekend after three weeks' holiday on the East Coast of the US.  With the rush of school starting again, and not quite knowing what to say about our trip, this post has taken a while to write.  Alex was running the Boston Marathon and we had decided to take a longer trip during the school holidays and visit Washington D.C. and New York (both are cities that I had been wanting to visit for a long time).  Of course, Boston didn't quite turn out the way we had planned.  Both of us are fine.  Alex had finished the marathon and were back in our hotel room in Cambridge (just across the river from Boston) when the explosions occurred.  We didn't see anything or hear anything, in fact the first we heard of the explosions was via Facebook from my cousin in New Zealand!  However, as you can imagine, it did put a big damper on what was otherwise an amazing day.  The locals really get into supporting the marathon, going out to cheer on the runners, whether they know them or not.  Alex even had strangers winding down car windows to yell "Congratulations!" to him when we were making our way back to the hotel afterwards.   We didn't manage to see as much of Boston as we'd hoped, as much of the city centre was closed off the day after the bombings, but we both really liked what we managed to see before the marathon and would love to go back some day and visit again.  It certainly puts a new perspective on front page world events when you happen to be caught up in the middle of one!  Especially when they are usually happening so far from NZ.  We felt very lucky to have escaped the worst of it and very loved by all the friends and family who got in touch to see how we were.
After all the excitement of Boston, we travelled to Washington D.C. by train and a week later to New York, both of which were amazing.  I really enjoyed Washington, especially the National Mall, a wide 3km-long strip of green space down the middle of the city lined with museums and monuments.  And New York, though as busy, noisy and dirty as I expected, didn't let me down in the wow-factor stakes.  We took about 400 photos (a LOT of them are of yummy vegan food we ate!), so I won't bore you with endless photos of famous monuments and buildings, but thought I'd just share a few of my favourites with you.

Self portrait in the hotel bathroom with my supporters sign - just before I caught the metro out to watch Alex along the marathon course.

 Happy to be finished

 Knitting and reading on the train to Washington D.C.

Self-portrait in front of the U.S. Capitol  We have a tradition of taking selfies in front of famous buildings and have a whole series of them now :)


 Cherry Blossoms in front of the U.S. Capitol, Washington D.C.


 At the Lincoln Memorial.  The steps I'm standing on are where Martin Luther King Jr gave his "I have a dream" speech.  You might also recognise it from Forrest Gump :)


 Gorgeous garden at Mount Vernon, George and Martha Washington's farm

 Statue of Liberty!

 Brooklyn Bridge

 New York skyline from the top of the Rockefeller Center.  In this photo I was trying hard to not look too freaked out by how high up we are! 

 Sneaky photo inside Purl Soho - so much fabric and yarny goodness!

 Gorgeous ceiling painted with constellations inside Grand Central Station, New York

 My favourite New York skyscraper, the Chrysler Building

 Mood Fabrics!  I am a big Project Runway fan and I walked around with a big grin on my face as I recognised parts of the store from the show!  I even met Swatch the Boston Terrier :)


Monday, 8 April 2013

{26 Things I Made} 4/26

Dino Taggie Toy

Made for my new nephew, Benjamin.  A simple wee taggie Stegosaurus (a Tagosaurus perhaps?) toy using this pattern.  I would have preferred a less psychedelic shade of green, but this was the most suitable dinosaur-coloured fleece at my local fabric shop.  I embroidered the eyes and put a rattle insert inside when I stuffed him.  The rattle inserts are baby-safe and I double stitched the ribbons so it should be OK for a newborn.  I bought my rattle inserts on Etsy, but local Wellington peeps might be interested to know that I've since discovered them at Pete's Emporium in Porirua.  They are small sealed plastic containers that have a few balls inside.  A good way to turn a simple small softie into a baby's rattle.

Tuesday, 26 March 2013

{26 Things I Made}: 3/26 Milo Monkey

Milo Monkey

This guy was made for my class as a mascot.  Each week one child gets to take him home on a Friday and then write about their weekend adventures in his journal.  I'd heard about this idea from a few other teachers and thought it was great as a reward/behaviour incentive.  His name is Milo Monkey, and my class of 22 Year 2 students (aged 5 and 6) just love him! I love him too.  In fact, I did briefly consider keeping him for myself...

I used the Monkey Man pattern from the Hop Skip Jump toys book and he came together really quickly and easily.  I highly recommend this book for the clear instructions and fantastic softie patterns.  I'm considering getting my own copy (though I notice it's currently sold out on the Book Depository). I used fabrics from my stash - a brown drill for his body and cream felt for his face.  His cute overalls are from a Japanese craft cotton.  

And just because, here are some more pictures of what he got up to at my house before I took him into meet my class and live at school...


Sunday, 17 March 2013

Hello again

I didn't really mean to stop blogging for (ahem) more than two years, but you know, life got busy (teaching is lots of work!) and I wasn't crafting, so I didn't think I could post without something to show. Then I thought no-one was reading anymore, so I kinda just stopped.

But, last year, while writing a blog for my classroom, I realised I missed my own piece of blog-land.  I have still been keeping up with reading blogs, and pinning projects on pinterest.  Now I feel like getting back into the blog game.  One of my resolutions for 2013 is to make time to craft more.  Teaching is one of those jobs where there is a never-ending to-do list and I realised that I needed to let go of some things and be content that everything will not always get done.

Last year I enjoyed reading Clare's "52 Things I Made" series on Green Valley Crafts and so I've decided to do a similar series here to try and get me blogging regularly again.  I think 52 things is a bit ambitious, so I'm aiming for 26.  One per fortnight.  And to start me off, here are the first two, knitted for my future niece or nephew (who was born yesterday and turned out to be a boy, so the cardigan has gone to the "baby gifts" box).

{26 Things I Made} 1/26 + 2/26
"In Threes" cardigan - Ravelry details here


Striped Pebble Vest - Ravelry details here


Monday, 4 October 2010

Christmas Ornament Swap

Yes, well, ahem. Didn't mean to neglect the blog for quite so long. But, as you may have guessed, my career change has been a lot more demanding on my spare time (previously crafting and blogging time) than I expected. Hence the lack of posts. Didn't really think you wanted to hear about how my weekends were taken up with planning and marking and writing reports.

Anyhoo, a few people have emailed me to see if I was going to run a Christmas Ornament Swap this year. Unfortunately, I can't see myself having time for that, however, the lovely Dione of Sew Funky has offered to run it this year, so you can go over here to her blog and sign yourself up for some Christmas crafty goodness.

I hope to try and post semi-regularly here, but I'm not making any promises. Maybe once my end-of-year reports are written in mid-November...

Monday, 25 January 2010

Anticipation

I realised last week that I've never posted about the fact that I have a teaching job for this year. In October last year amongst the rush of exams and assignments, I had an interview and was offered a job at the school I went to for my second teaching placement. I was really pleased to have gotten a job at that school because I'd enjoyed my time there immensely and was impressed by the facilities and the supportive staff. My contract has been signed, my teacher registration finalised as of last week, and in about eight days I'll be introducing myself to my first class of year three children. I'm really excited and scared stiff at the same time. It's finally almost here - what I studied for so hard last year!

Last week I spent most days in my classroom (I love saying "my classroom"), setting up wall displays and deciding where the furniture will go. I thought the reading corner looked a little tired and needed jazzing up a bit, so I made some new floor-cushion covers with denim and some bright fabric from my stash.

floor cushions for my classroom :)

Much nicer I think! This week's jobs are to finalise my planning so I'll be well-prepared on my first day and have no excuse to be nervous.

Monday, 18 January 2010

Triangle quilt

Remember this?
triangles

And this?
more quilt progress

Well, it's finally, finally finished...
finished rescued quilt

I explained the origins of this quilt here. The short version is that I bought some quilt pieces in an online auction and then decided to sew my first quilt without a pattern or a plan. Despite the wonky triangles and the uneven quilting, I'm pretty pleased with it, and the handmade-ness just adds to the character I reckon. It's been sitting waiting for me to find the perfect binding fabric for about (*ahem*) 6 months, but over the Christmas break I decided it needed to be finished right then and there, and so had to settle for the beige spot fabric I had in my stash. The binding is machine and hand-stitched and I used this great tutorial to create the mitred corners.

finished rescued quilt

I had been considering using a vintage sheet to back it, but then I found a cute light blue floral on sale at Spotlight and thought it would work well with the rest of the fabrics. The white cotton is left over from our wedding eight years ago - we got married in a forest clearing in Rotorua, and I walked down an "aisle" of white cotton fabric. Now the cotton is in my craft stash to be used in special projects.

finished rescued quilt

The finished size is around 1.2 by 1.4 metres. Perfect for keeping your legs warm while watching TV. And it's come in handy in the cold snap we've had over the last week or so in Wellington.

Saturday, 2 January 2010

First harvest

Harvest
Kale, spinach, baby beetroot and baby carrots from our vege garden.