Image "borrowed" from Juniper blog.
Wednesday, 30 April 2008
Lucky Dip craft night at Juniper
Image "borrowed" from Juniper blog.
Monday, 28 April 2008
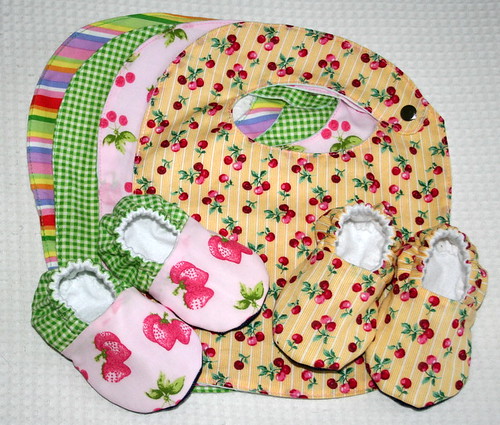
Baby Sewing
Thursday, 24 April 2008
I heart freezer paper stencils
Monday, 21 April 2008
Thank you and a giveaway
Writing this blog has been a lot more enjoyable than I'd expected. Not many of my "real-life" friends are crafty, so I really enjoy the contact I've made with a community of super-talented, inspiring people. I read and appreciate each of your comments, even though I don't always have time to respond to you individually.
So to say thank you, I'd like to host my first giveaway. This sweet little cat has been keeping me company on my sewing table for a couple of weeks, but it's now time for her to go to another home. She is made from new and thrifted cotton, denim and acrylic felt. Her face is embroidered and she is filled with polyfill. She is willing to travel anywhere in the world to her new home.
If you would like to go in the draw, please leave a comment below. I will draw a random number next Monday, May 28th.
Thursday, 17 April 2008
Tutorial Roundup - bags
So, the first in this series is bags. There are a huge number of great tutorials out there; the following are just some of my favourites:
1. Jordy Bag: When I first got back into sewing in a big way, the thing I started with was bags, specifically the Jordy Bag on Craftster. This is a great, very popular, beginner pattern for a lined square-bottomed bag. There are a lot of variations on Craftster to give you ideas of how to adapt the pattern to make it your own. This pattern can be easily adapted to make a basic tote bag by making it bigger and adding two small handles rather than one long handle.
2. The Wasp Bag (see picture above): one of my favourite patterns. I love the slouchy look of it and the pleats and round bottom mean you can stuff a lot of stuff in this bag! This has become my everyday handbag. The construction method used for this bag is slightly confusing, so I recommend you don’t attempt this pattern if you are a newbie sewer.
3. Triangular Cosmetics Bag: Another Craftster tutorial. I adapted this pattern slightly and made a lot of these for Christmas presents last year. Don’t be put off by the zip – the instructions include lots of pictures to guide you through.
4. One Hour bag: I have yet to make this one, but it looks super-easy and is a nice shape.
5. Hobo Bag: Another one on my to-do list.
6. Skipping/Bucket Bag. Great tutorial from Melissa of Tiny Happy. Another variation of the same shape of bag (slightly more complicated construction) can be found here at LulaLouise.
Many more bag tutorials can be found here on Craftster.
Hope you find these useful. If you have any other favourites, I'd love to hear about them. Happy sewing!
Wednesday, 16 April 2008
Sewing with knits
The first project I made was a disaster and has been consigned to the "chuck or remake into something else" pile for now - I attempted an apron top with a rolled hem edge, based on a top I already own. It was a bit ambitious for a first project, and the silk fabric I chose was too lightweight so the cowl neck doesn't sit quite right. I may try the pattern again with a heavier fabric, but I decided to move away from rolled hems on slippery fabrics to something more suitable for a first project...
Here is my first (of many I suspect), long-sleeved merino knit top:
I had been scared of sewing knits up until now, as I always ended up with wavy seams when I used my ordinary (but quite old) sewing machine. But the overlocker makes it so easy to do side-seams in one go. And the differential feed means the seams are flat and not wavy! Hallelujah - a whole new world of sewing knits has been opened up for me.
I used some fine merino knit that I picked up from Fabric Warehouse for $18 a metre. I think I used about a metre of fabric in total. I cut the pattern off an existing merino top. Around the neck I used some stretchy binding that is made specifically for knits. The lady in the Fabric Warehouse assured me that it was easy to use, but I had trouble getting it to sit properly on the hem and sleeves and ended up unpicking it and adding bands instead. For some reason the binding looked much better on the neck. Next time I might try and experiment with hemming the bottom seam on my sewing machine.
The fit is pretty good, given that I am no pattern-making expert. It fits a smidgen more snugly than I wanted however, because I made the fatal error of forgetting to include the width of the overlocker hem (7mm) in my calculations, so I added a 12mm seam allowance and then cut all of it off when I did the seams (I should have only cut off 5mm). Whoops. But it still fits at least, and I needed a fitted warm top to wear under short-sleeved tops anyway (I like how I can justify my stuff-up!).
I can see myself making a few merino tops; maybe a wrap cardigan style (an adult-sized long-sleeved version of this from Tiny Happy perhaps) or adding some embellishments, like a freezer paper stencil (I really like this one that Jessicah at Spinning a Yarn made).
In addition to the merino top, I also had a practice at re-styling some baggy tshirts to make them more fitted. Also a lot of fun, but more on that later.
Edited to add:
A couple of people have asked me about the stretchy binding I used. It is called Foldover Elastic Binding. It's about an inch wide with a thin piece along the middle that allows you to fold it in half easily. One side is matte, the other side is shiny. It is the same stuff that is used to bind the necks of some merino tops you can buy from places like Max. From some google searches, it looks like the same stuff is often used on home-made cloth nappies to bind the legs.
I had trouble getting the seam to lay flat. I was applying the binding in one step with a straight stitch, catching the front and back at the same time and using lots of pins - I think I was stretching the seam too much as I sewed. I have since found some tutorials online that say to apply the binding to the back using a zigzag first and then fold it in half and straight stitch the top. That might give a better finish - I will do some experimenting.
Saturday, 12 April 2008
Lovely Mail
Today I wanted to show you a few lovely things I received in the mail this week.
The first is a lovely red singlet that I bought from Rhiannon of Toast and Cupcakes. It features a stunning applique of my favourite bird, the NZ fantail (piwakawaka). I wore it to work yesterday with a long-sleeved top underneath and it looked great! I'm going to get a lot of wear out of this I think. Thanks Rhiannon!
The second is a parcel I received from Helen of Show Your Workings. I won a giveaway on her blog and was sent this wonderful Matryoshka softie. She is lovely and is going to look great in my new sewing space once it's set up. Thanks Helen! This is the second blog giveaway I've won. I've been thinking it's about time I reciprocated and did a giveaway myself. Maybe next week.
The final thing I wanted to show you was some new craft books I ordered from The Book Depository. I got Simple Sewing by Lotta Jansdotter and In Stitches by Amy Butler. Can I just say, wow! They are both great, inspiring books. Lots of wonderful photos and simple stylish projects. I can see myself making a lot of things out of them.
Thursday, 10 April 2008
Japanese Fabric
She obviously knows me very well, because I love all the fabrics! In fact I have been coveting the owl and rabbit prints (in the middle of the photo) in some online stores. All the prints also coordinate well with my existing stash. I'm looking forward to using these in some baby shoes and bags.
Wednesday, 9 April 2008
Denim and Doilies
I first saw this idea here at Somner Designs and then here at Tiny Happy. So easy and (almost) instant gratification. I sewed these doilies on by hand but I'm sure you could also carefully machine sew them. I think it will look great with my winter boots - the doilies remind me of snowflakes.
Tuesday, 8 April 2008
30
Today is my birthday. The calendar says I'm turning 30, which I find very hard to believe. I certainly don't feel 30. When I was in my early 20s, 30 seemed, well, old. But now that I'm here, it seems OK. I'm a lot more mature now than I was 10 years ago. And I know a lot more about myself and my goals. I've also stopped caring so much about what other people think. And those are good things I think.
I celebrated with friends over dinner on Saturday and with family over cake on Sunday. I've been having an extended weekend and took Monday and today off work to relax and get some crafting done. I should have some photos to show you later in the week.Right, I'd better be off - Alex got me an overlocker (serger) for my birthday and I'm about to go and pick it up. Looking forward to playing with my new toy!
Sunday, 6 April 2008
Rainbow wool
I loosely following the instructions from here, here and here, following the microwave method rather than the stovetop method. I mixed the colours up in plastic bottles with squeeze-top lids which worked really well for applying the colour. I only used enough warm water to dissolve the powder.
Here's the wool in the laundry sink, just after I've finished applying the colour:
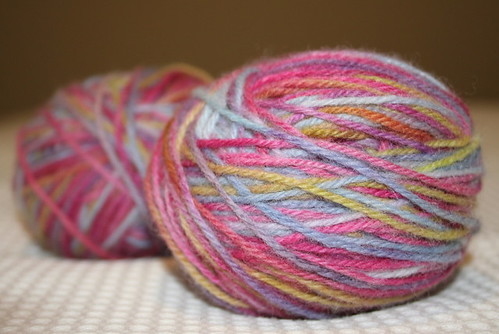
Here it is about a week later, dry and wound into balls. I'm really surprised at how vibrant the colours remained once it dried:
Some tips if you're going to try this yourself:
1. Just because you are using something that is theoretically "edible" to dye the wool, do not assume that spilt dye will not leave a stain on your kitchen bench if you don't wipe it up straight away.
2. Ensure the dish you are going use actually fits in the microwave before you put your dripping just-dyed hank of wool in it - transferring the dye to a smaller dish may mean the dye spills all over your kitchen bench (see tip above).
3. Think carefully about what colours you will use and how they will look when combined with the colour next to them. I used red (Raspberry Refresh), green (Sour Apple Raro) and blue (Wacky Raspberry Raro). In hindsight I think I should have just used red and blue and made a feature of the purple where they mixed together. Plus, the green turned sort-of yellowy-orange when it mixed with the red, which was not the look I was after!
4. Mark in some way the ends of the hank of wool so that later when you are winding it back into balls, you can find the ends and the hank doesn't end up in a greatbigmessytangle.
5. Use the best wool you can sacrifice. I used cheap scratchy white op-shop wool. Though I now have lovely rainbow dyed wool, it is still scratchy, so not really suitable for hats or scarves. I think I might try knitting a bag and felting it, maybe something along the lines of this.
Tuesday, 1 April 2008
Thrifty Finds
I picked up a couple of great old sewing reference books at an op-shop (thrift store) recently and wanted to share them with you.
"McCall's Sewing in Colour" was published in 1963, but still has a lot of good reference information that I'll find useful I think. It's divided into sections such as facing, collars, cuffs etc. There is also a fair bit of content that really places the book squarely in the 1960s. My favourite pages are those that explain the basic wardrobe needs of a modern woman:
Under the heading At Home it says "The homemaker often makes the big mistake of thing she does not have to look her best when doing her daily chores. Actually, ill-fitting clothes lower her morale and make her less able to cope with everyday trials. This doesn't mean she has to dress up, but it does mean that she should look neat and trim..." hmmm, kinda rules out my round-the-house weekend outfits! Also, under For Shopping (in a "City Department Store") it warns "Slacks and shorts are taboo". So now you know.
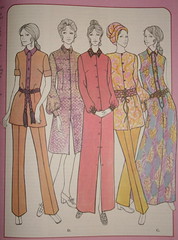
The second book, "Golden Hands Encyclopedia of Dressmaking" was published in 1972. It is also a sewing reference, but focusses more on pattern-making and includes quite a few patterns for women's and children's clothing with instructions for how to alter them to fit you. I'm hoping that along with the pattern-making class I recently went to, I should be abe to use this book to make myself some new winter skirts. Lots of great illustrations and photos in this one: